
Pattern by Meguey Baker
This article was made possible by the generous support of our patrons. Please consider joining them by supporting us on Patreon.
Face masks are an important part of the covid-19 safer social hygiene orders of 2020. Most home sewn models are solid fabric, covering the nose and mouth completely in order to contain one’s own germs.
For some people who are hard of hearing, and use lipreading for some or all of their verbal communication from other people, masks have been a profoundly isolating and difficult shift, as the mouths of those around them are hidden. If someone cannot hear or lip read clearly, they cannot keep social distance of 6+’ as easily.
For medical professionals who serve this population, a clear mask is extremely important. On May 6, Dr. Alexandra Tully, audiologist, asked me to develop a mask she and her staff could wear while assisting clients that would both allow clients to see their lips and be compliant with state orders for masks outside the home. This is what I devised. Dr. Tully tested the prototype in the office, in conjunction with a clear full-face shield, and found it to be enough of an improvement to put into small-scale production for her staff.
I cannot sew Visible Masks for everyone who needs one, so I’m hoping this step-by-step will be of use to people who can sew. If you have a member of your household who uses lipreading to understand you and you CANNOT sew, and have no one in your immediate community who can, please do email me at megueyb@gmail.com, and I’ll make one for you ($15 per, shipped within the US – these are trickier than regular solid cloth masks!)
This pattern is free for personal use; if you make these to use yourself or to give away, you may. If you make some to sell, please credit me and please don’t undersell your time and resources.
Ok, here’s the step-by-step. May it be of use. Also available for download as a PDF: Visible Mask Pattern by Meguey Baker
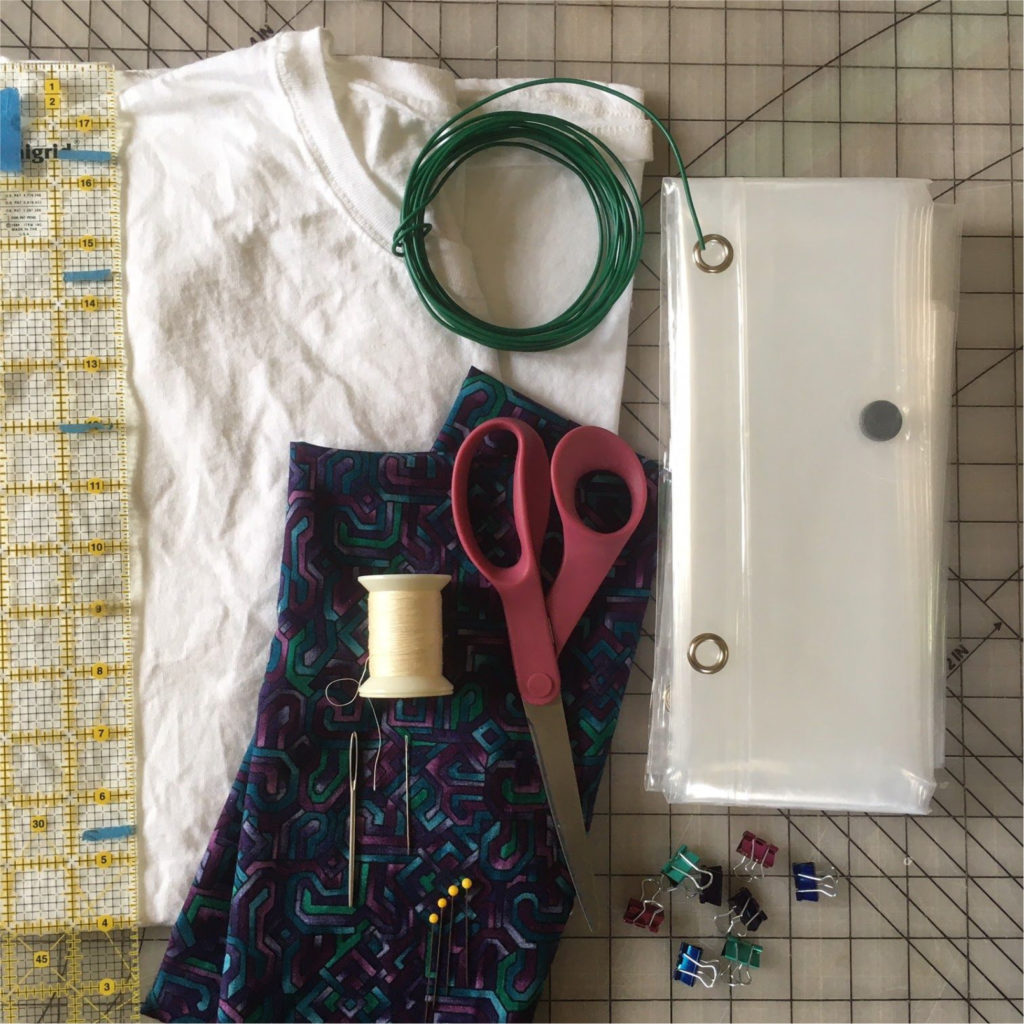
Supplies
- A ruler, pen, and 3”x3” sticky notes (or 3×5 card – cereal box cardboard works great)
- Washed and dried 100% cotton regular t-shirt (if you can see your hand through it, it’s too thin)
- Washed and dried 100% cotton quilting fabric (same as above)
- Cotton thread, scissors, and sharp sewing needle
- 4 straight pins
- Large eye needle, such as a tapestry needle or etc
- 12 gauge wire for nose piece (or thinner doubled or tripled and twisted smoothly together, or pipe cleaners or twist ties)
- Clear 100% PEVA shower curtain (one curtain will make a LOT of masks!) LEAVE IT FOLDED!
- A handful of small bulldog clips (or paperclips or bobbypins)
- Glue or wax-based chapstick to seal the stitch line after sewing and AFTER EACH WASH
Extra nice supplies to have
- Sewing machine and iron
- Rotary cutter and self-healing mat
- Square lucite ruler(s) and painters tape to mark the measurements
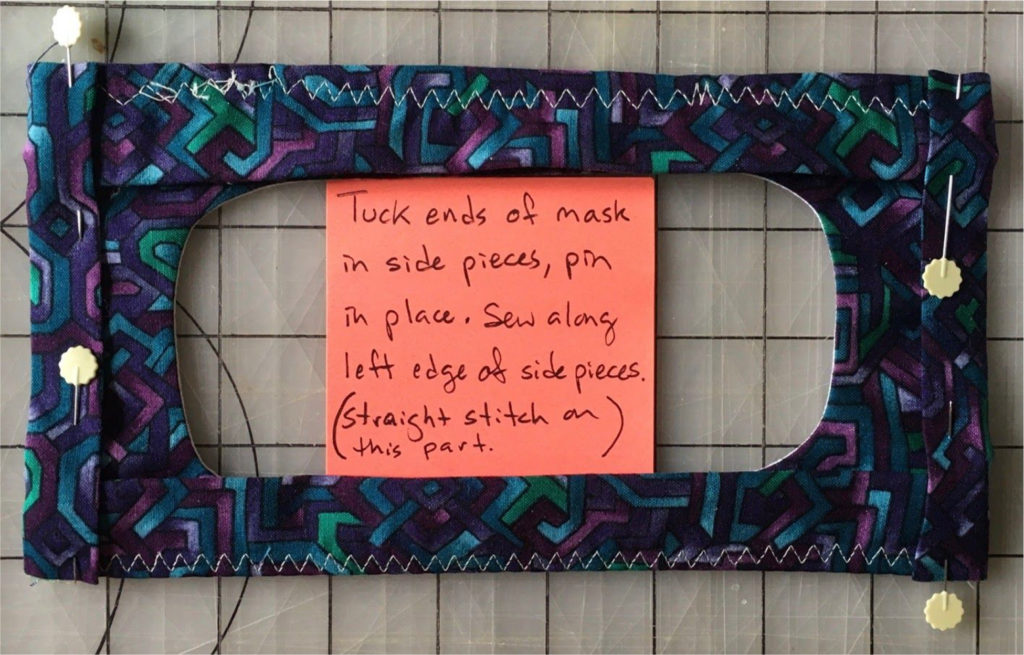
- Wire cutters
Pattern & Directions
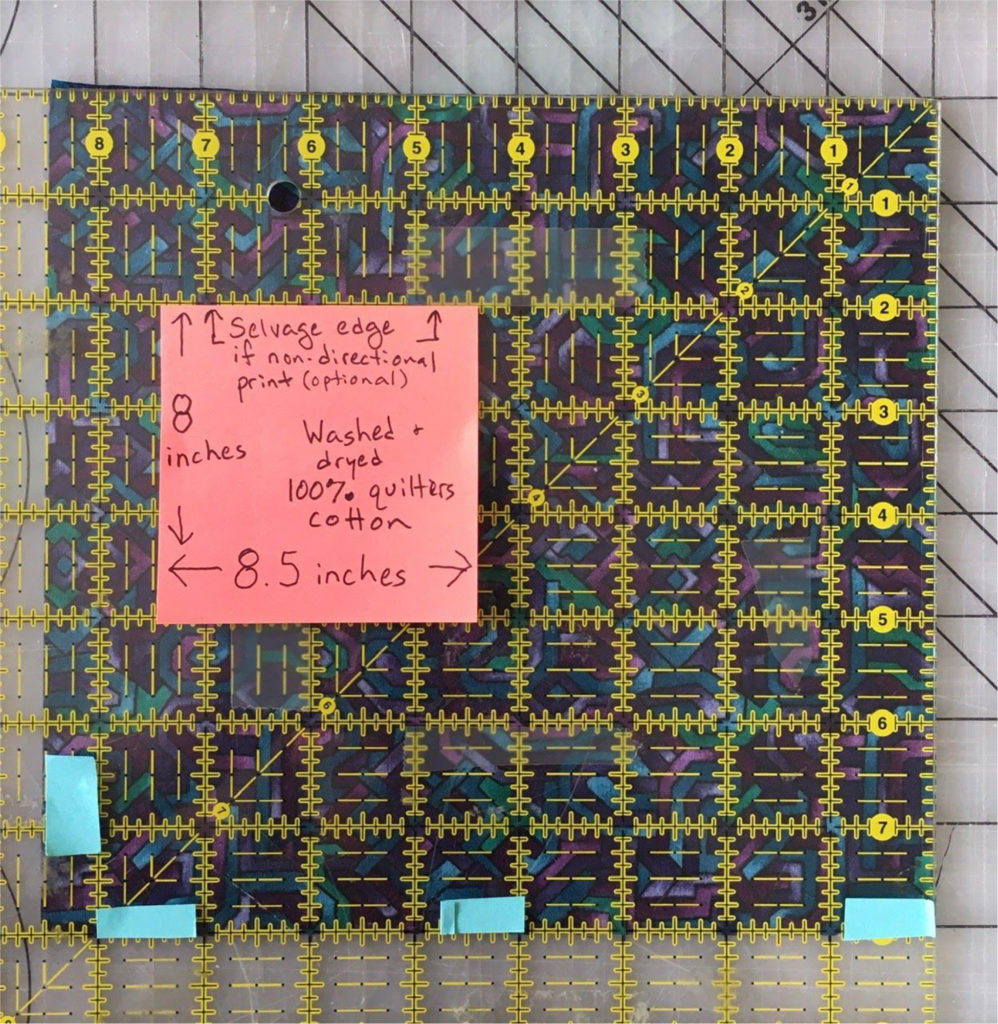
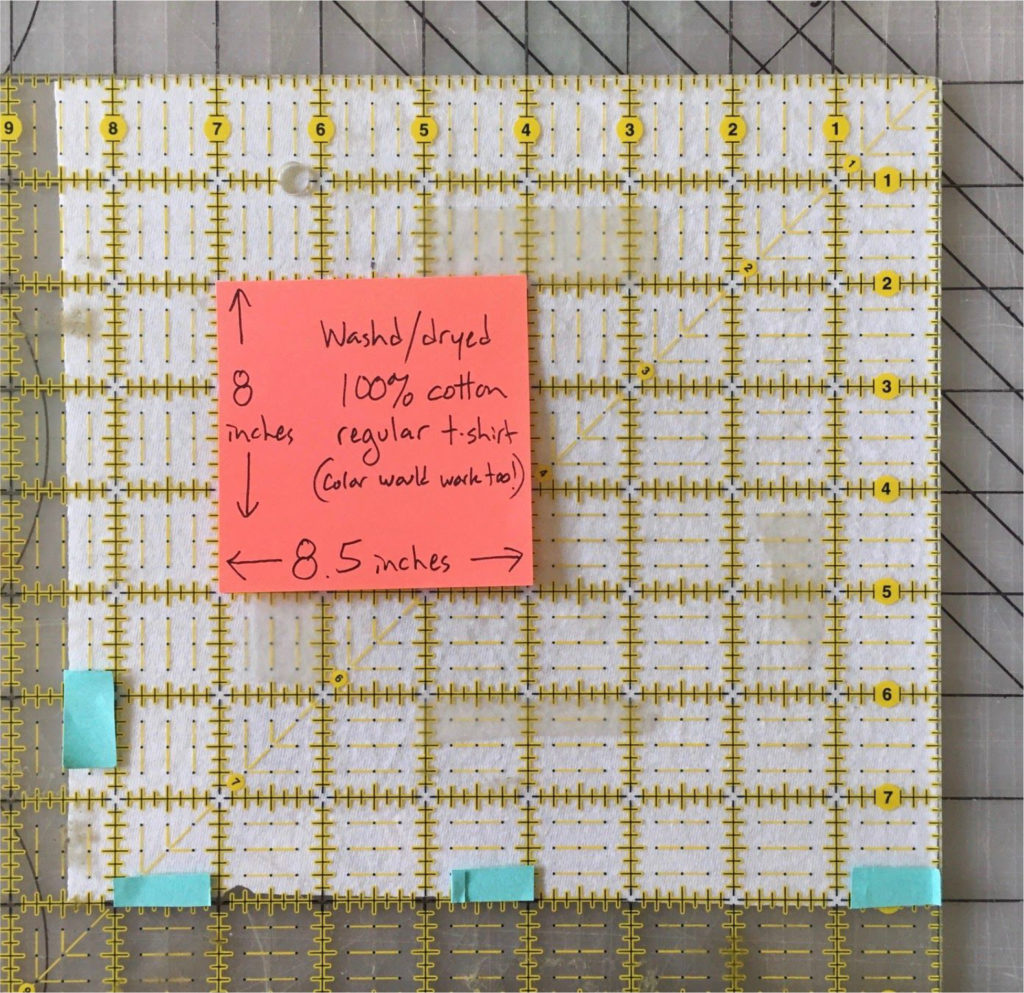
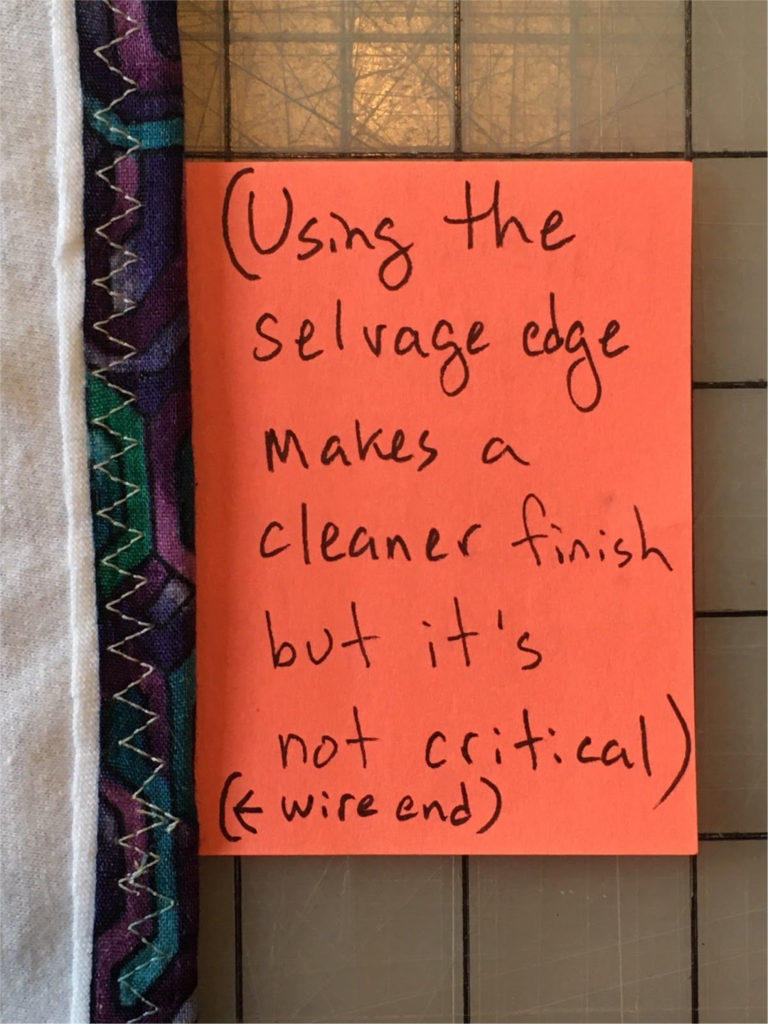
1. Iron your fabrics and cut them. If you don’t have an iron, make sure you take the fabric and t-shirt out of the drier IMMEDIATELY after or even a bit before it’s finished and lay it flat. If you don’t have a drier, hang them to dry. Cut an 8” high by 8.5” wide piece of fabric. If the print has no clear direction, placing the long edge along the selvage makes a slightly more finished upper edge, but it’s no big thing.
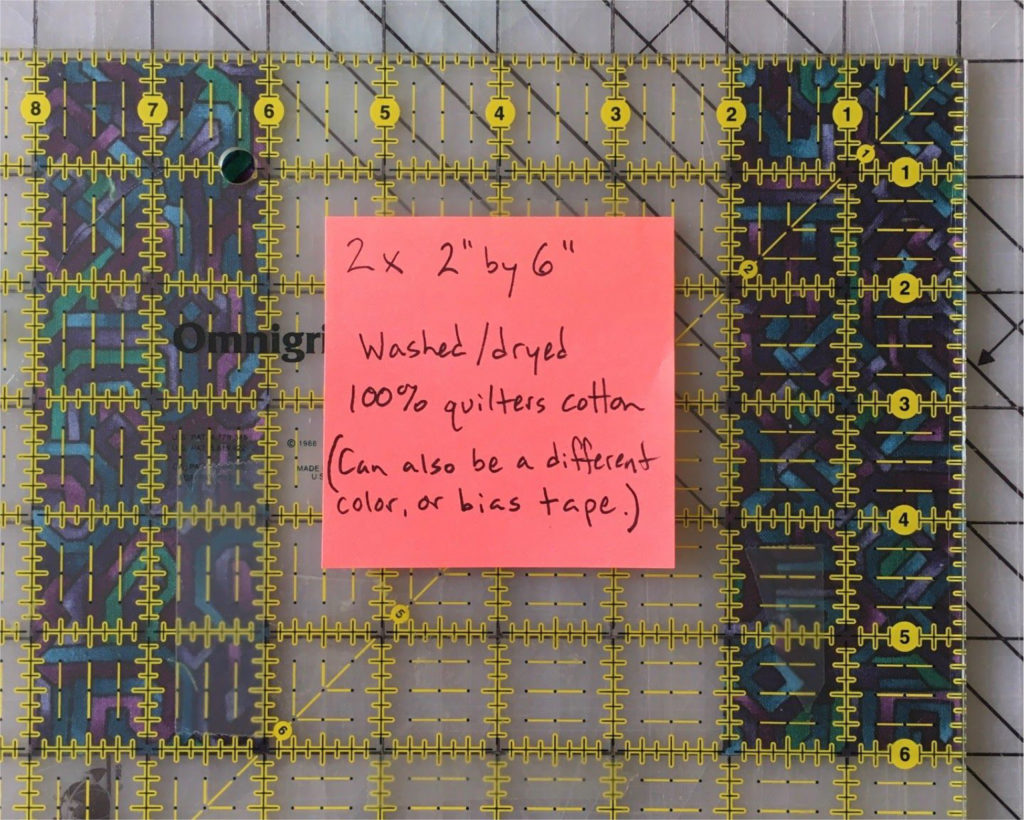
2. You will also need two smaller pieces for the sides, 6” high by 2” wide. Bias binding would also work for the sides.
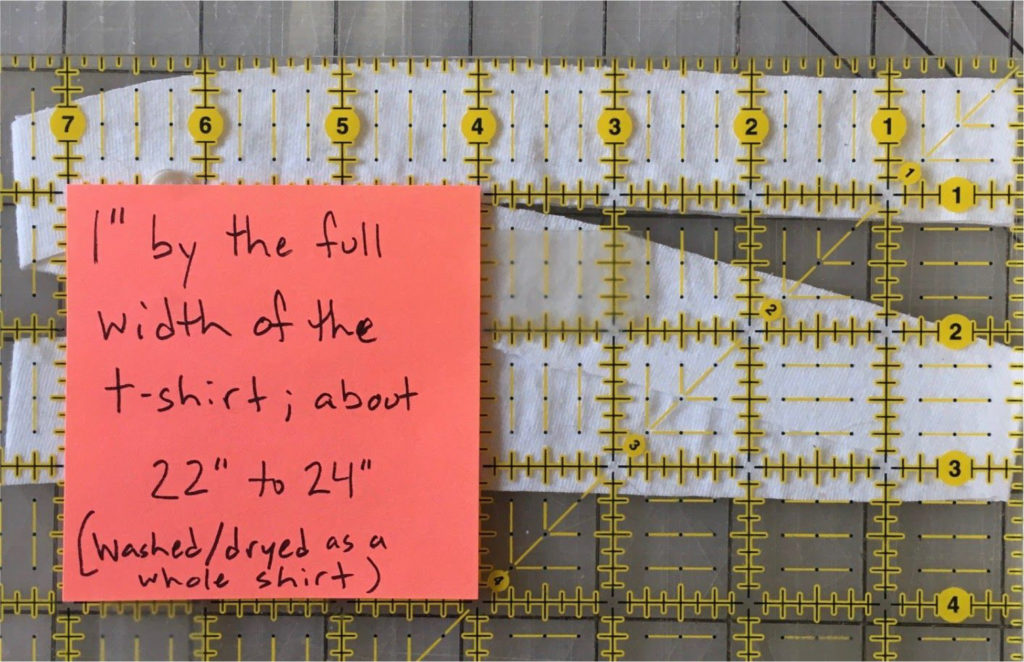
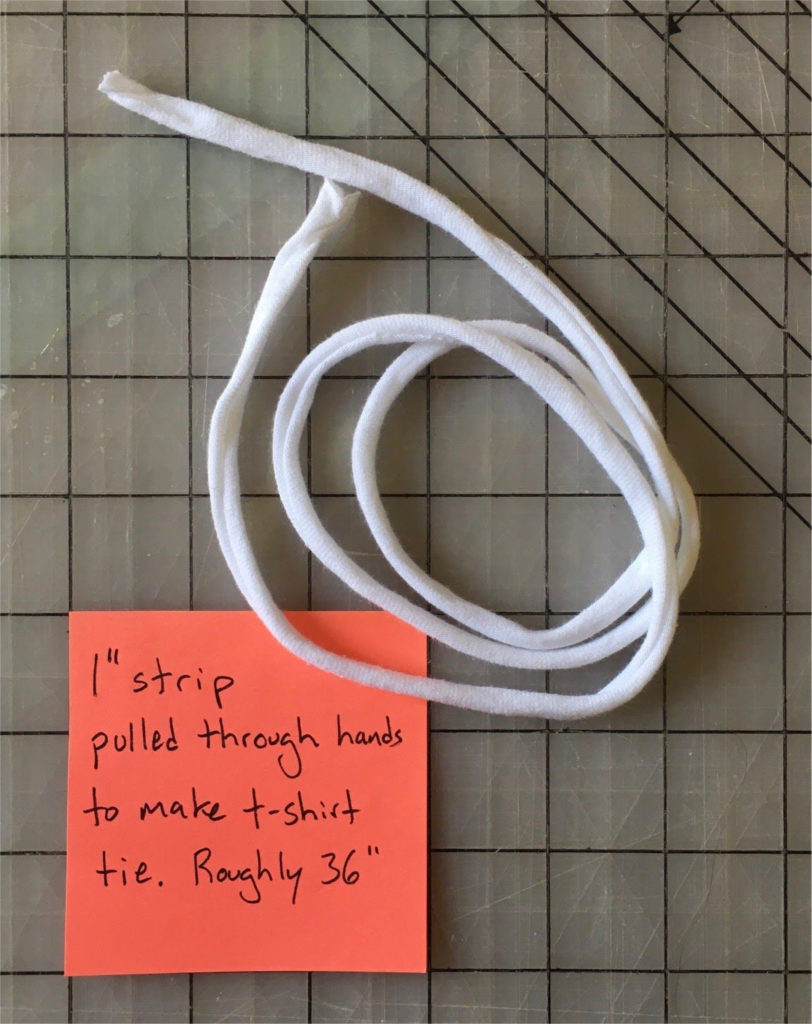
3. Lay the shirt flat, and carefully cut off the bottom hem of the t-shirt so you’ve cut off the serged ridge of stitching. Cut a 1” high strip across the body of the shirt. This will make ties for two masks. If you are doing a lot of masks, cut 1” strips all the way up the body of one shirt to the underarm seam.
4. Run the loop through your hands a couple times and stretch it out. This will make it roll up on itself and be easier to thread later. Cut in half.
5. Cut an 8” high strip across the body of the shirt. Keeping the tube flat, carefully cut along ONE of the end folds. Measure out 8.5” from the cut end, and cut to make two layers of t-shirt. You’ll use one for this mask, and then you can make a second with the other! I can get about 9 t-shirt pieces from one XL shirt.
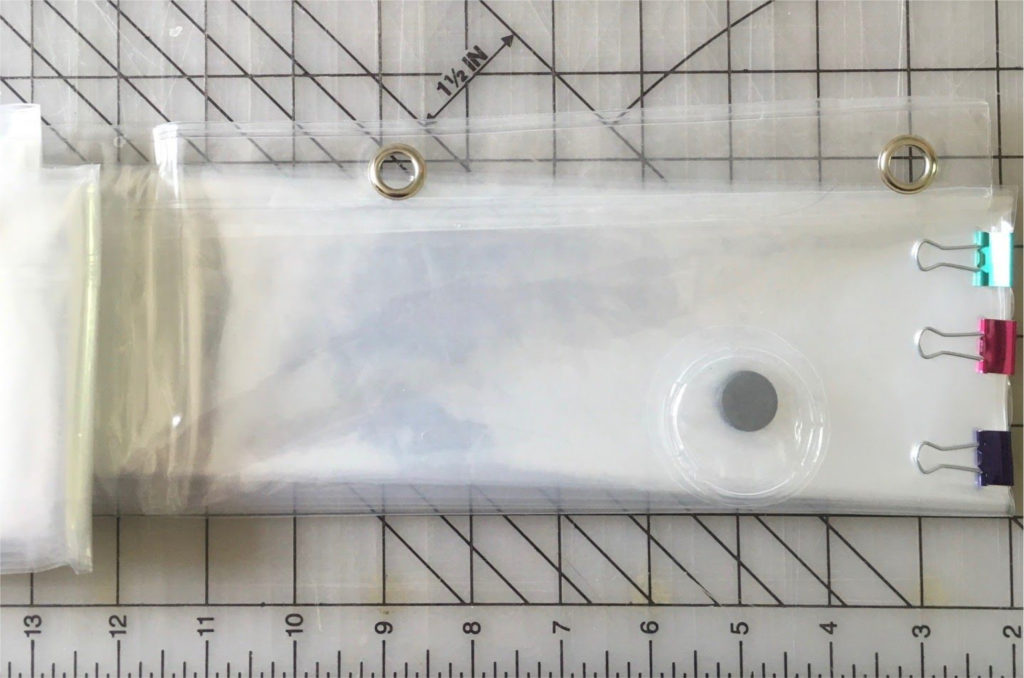
6. Take your STILL FOLDED shower curtain, unfold it JUST ENOUGH so that you can see the grommets and any magnets. Use the bulldog clips on the end to hold all the layers together. Cut 5” in from the end. This will clear both grommets and the magnet. LEAVE THE REST FOLDED and cut another strip when you need it.
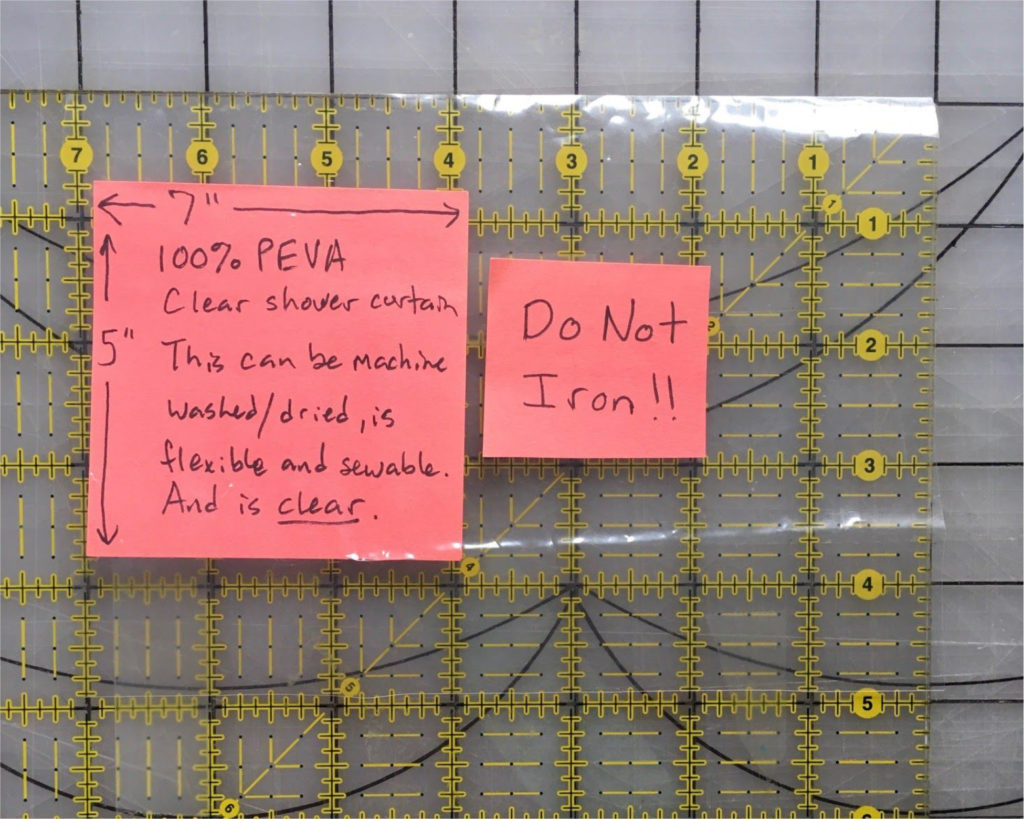
7. Unfold your 5” strip, cut off the couple inches with the grommet, and cut a 7”x5” piece. You will trim this down later, so the edges don’t need to be super clean. DO NOT IRON plastic!
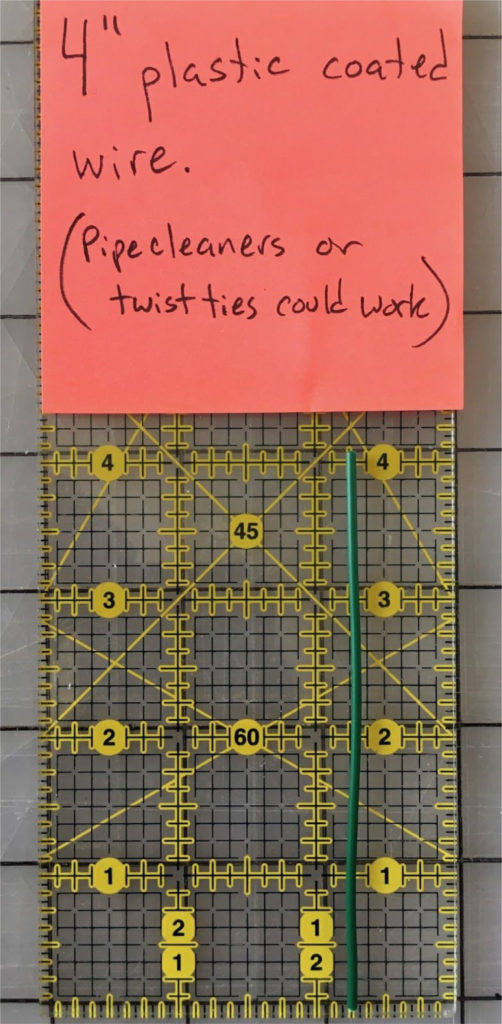
8. Cut 4” of the wire for the nose piece. Pipe-cleaners or twist ties can also work. Set the wire and vinyl aside for now. Drink some water. Stretch your back.
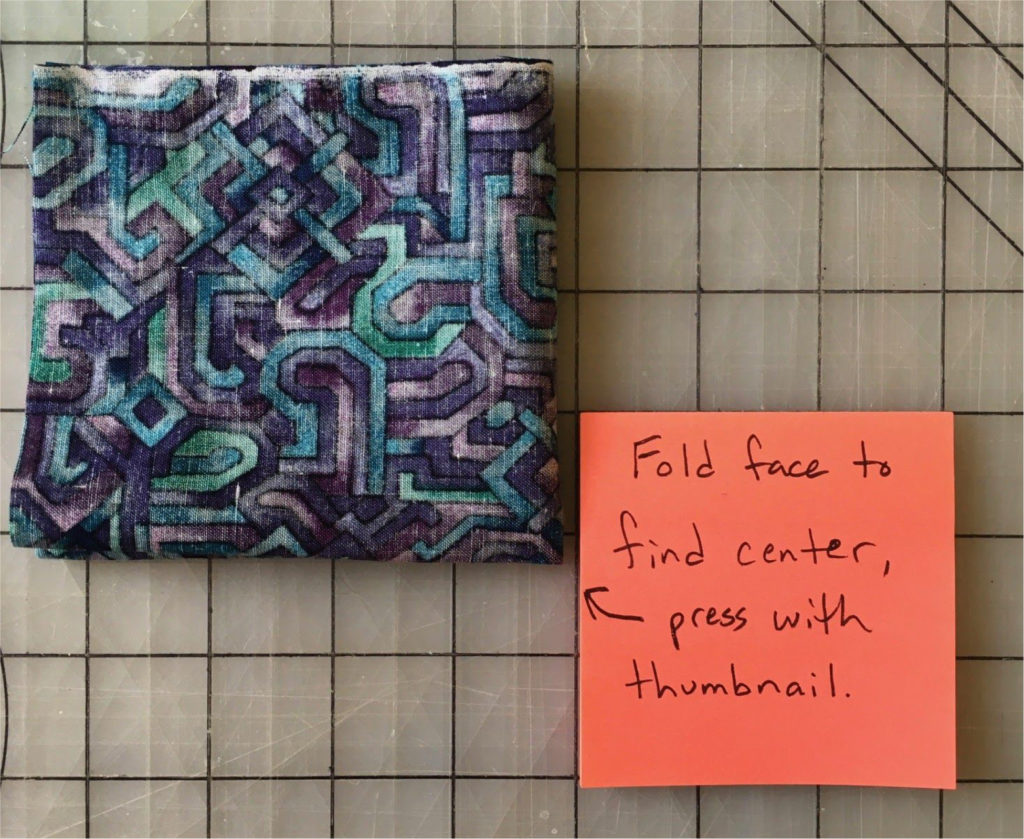
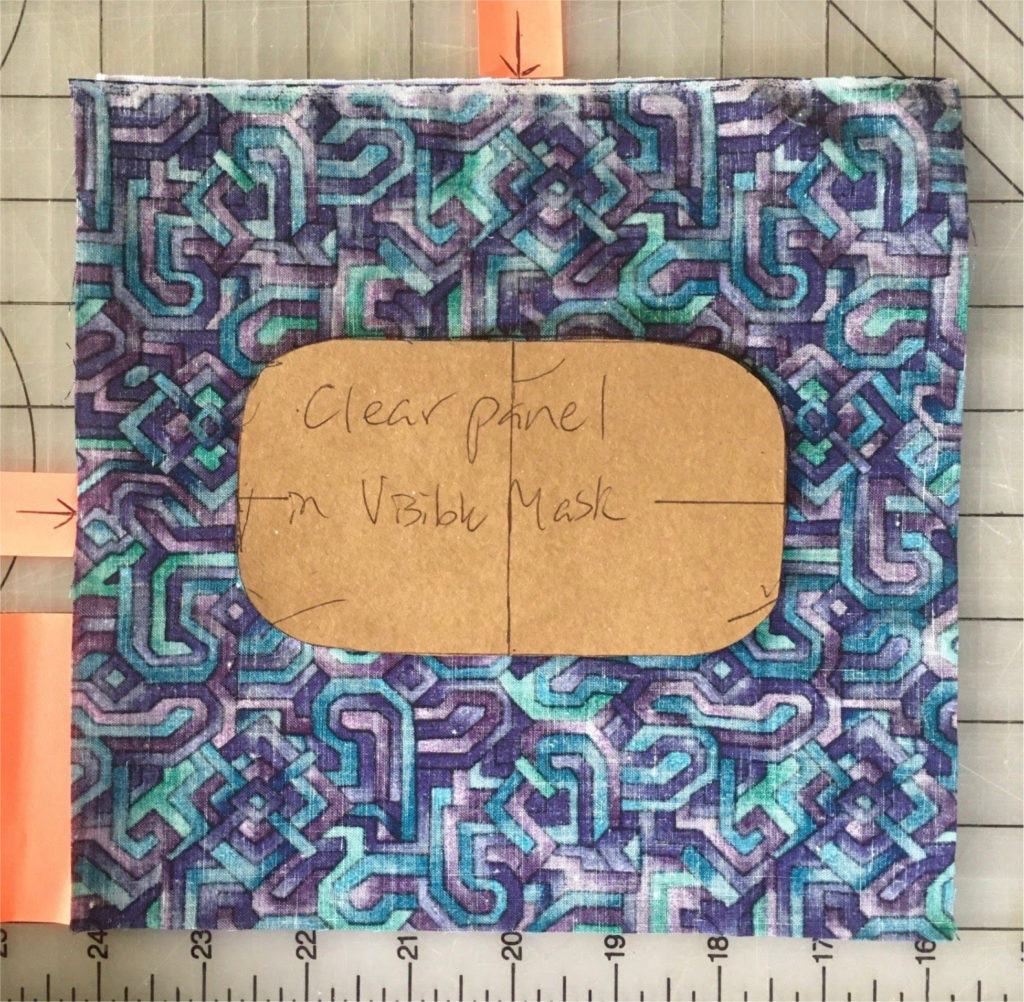
9. Find the center of the fabric piece by folding it in quarters and giving it a quick crease with your thumbnail. Keep track of which is the long edge and which is the short edge.
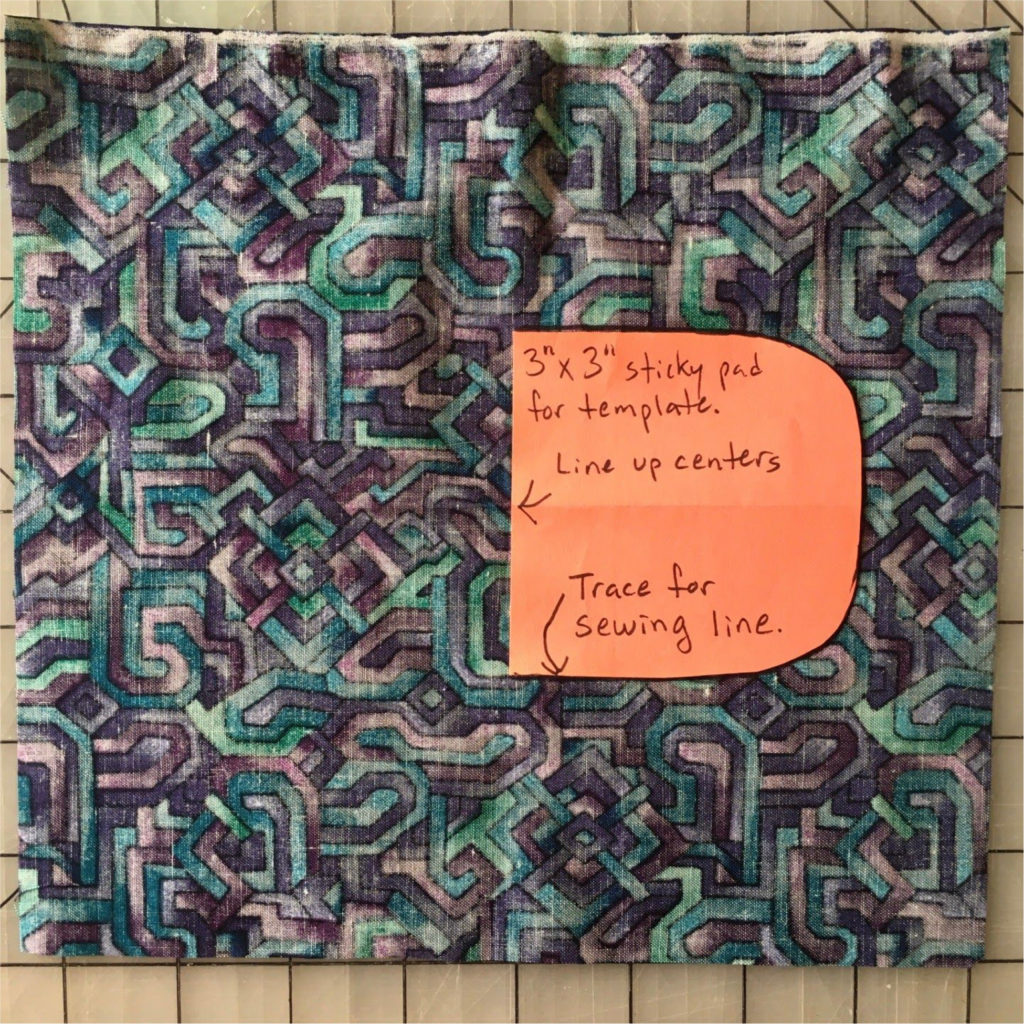
10. Make a template with rounded corners from a piece of cardstock or a 3”x3” sticky note. Find the center of your template, line it up with the center of your 8” by 8.5” fabric. The sticky note sticks to the fabric a bit, which can help some folks. On the horizontal axis, trace the template with a pen. Felt tip works best for me. This is your sewing line, so make it dark enough to see.
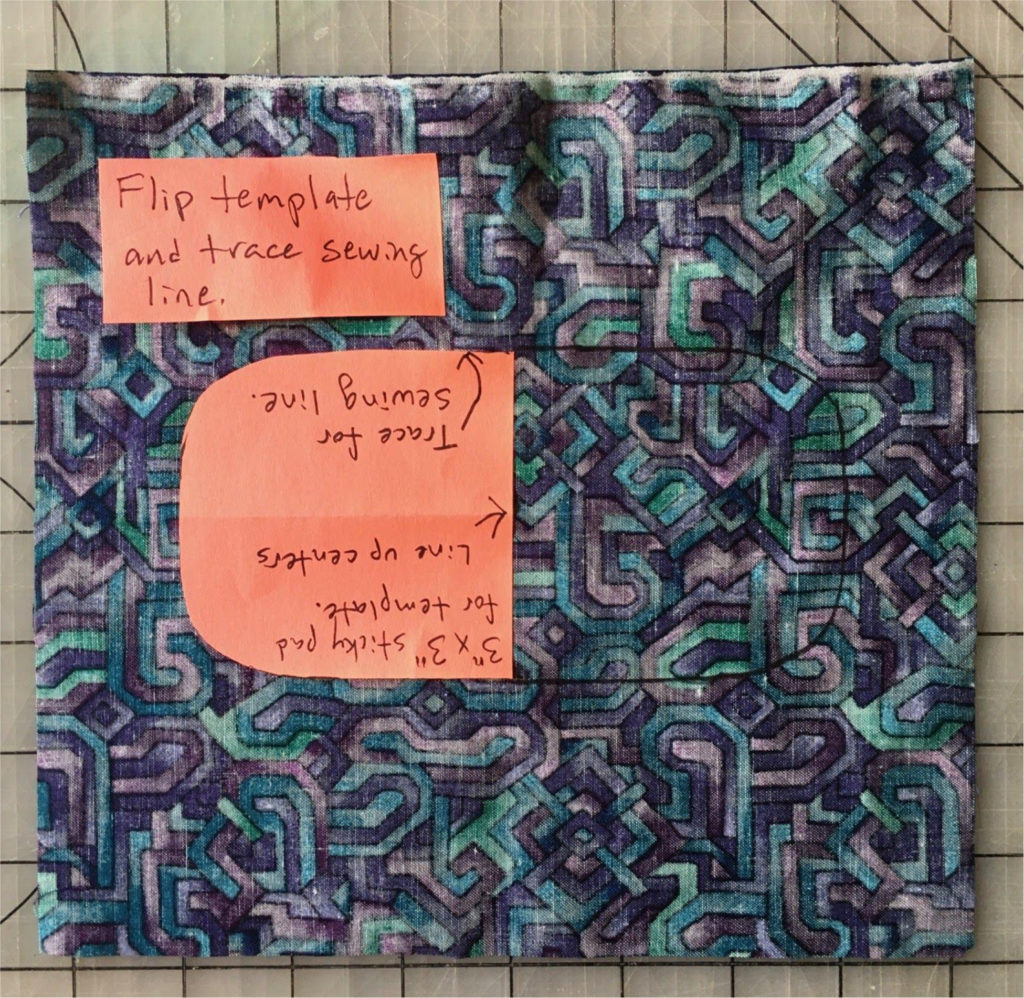
11. If you’re making a lot of masks, a cardboard pattern is sturdier. Make a jig to keep track of the centering; I use sticky notes on my cutting mat. Make sure the fabric is aligned properly.
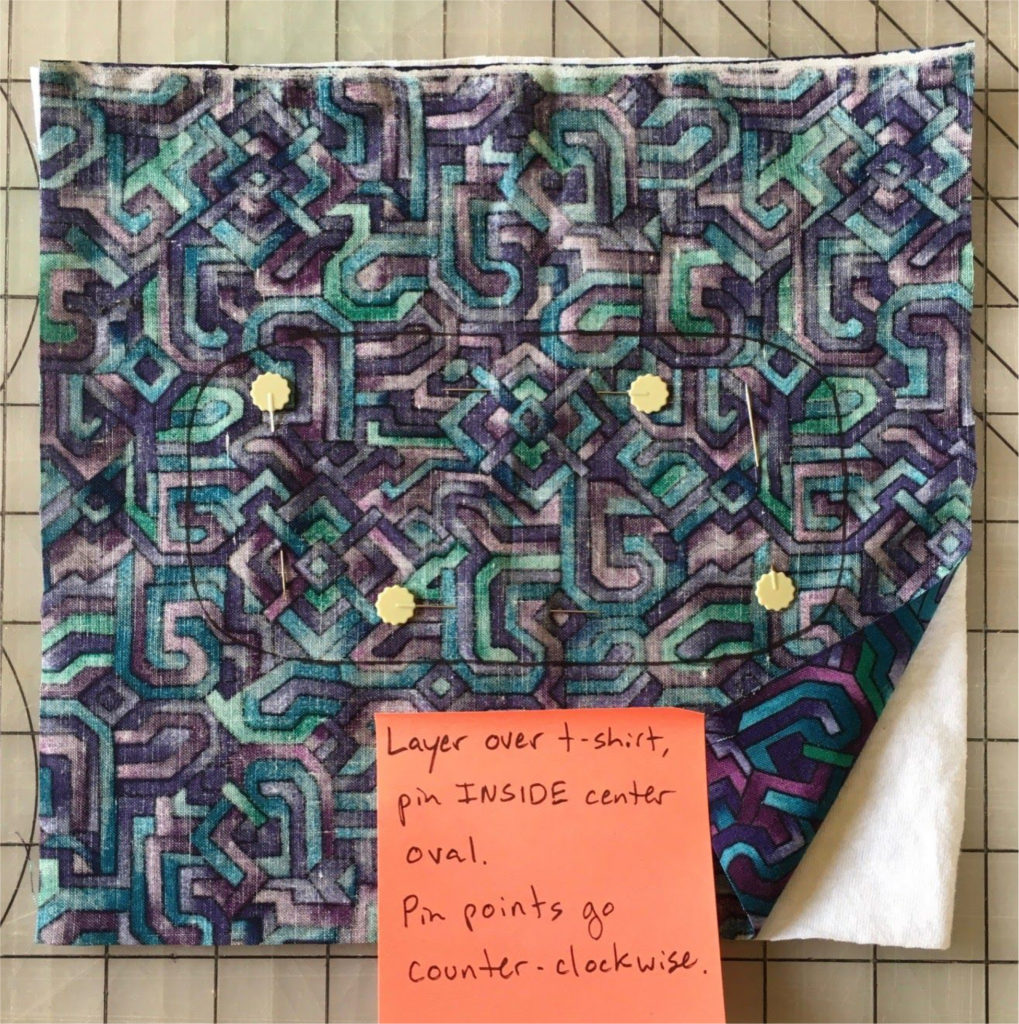
12. Layer your marked fabric face down on the t-shirt fabric. Pin INSIDE the marked oval, with the points going counter clockwise. This matters a lot if you are using a sewing machine, less so if you are hand sewing. The goal is to keep pinholes AWAY from the body of the mask.
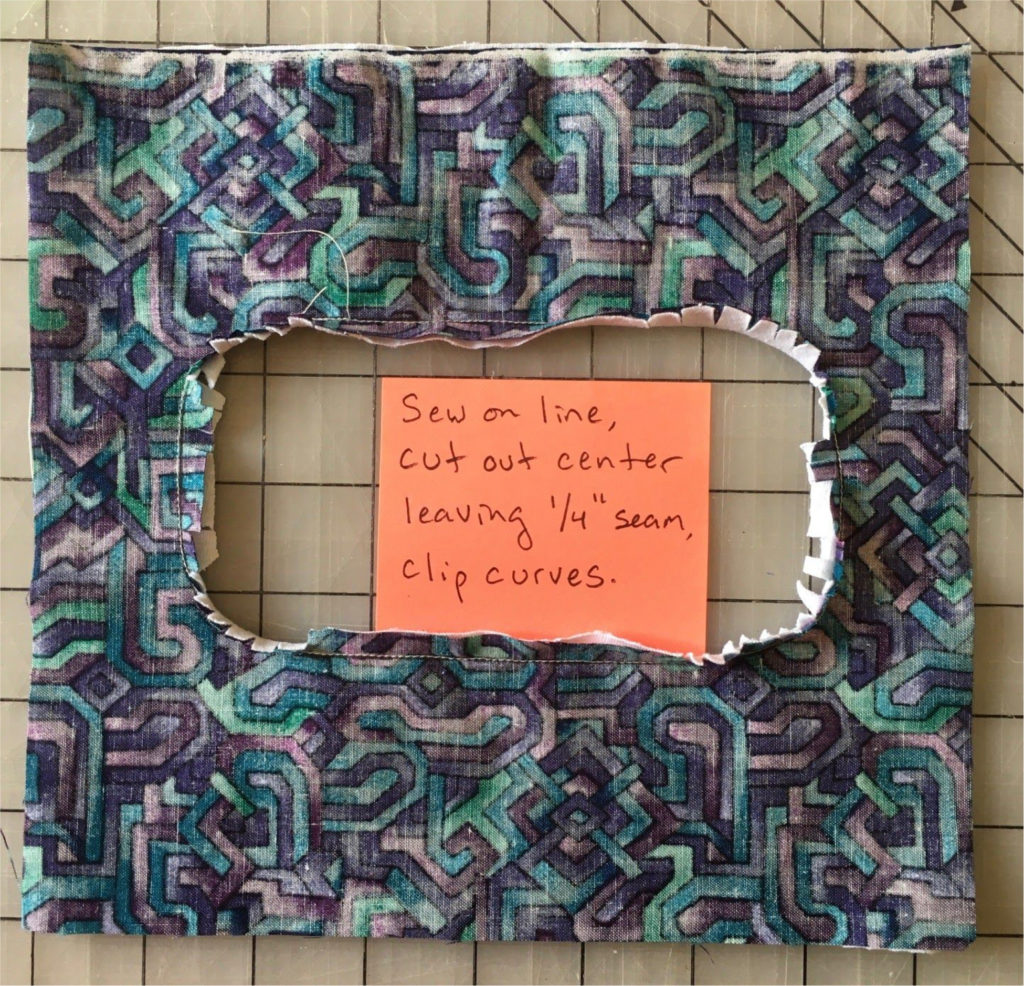
13. Stitch on the marked line, cut INSIDE the oval leaving a ¼” seam allowance, and clip the curves perpendicular to the stitch line, being careful to keep the stitch line intact.
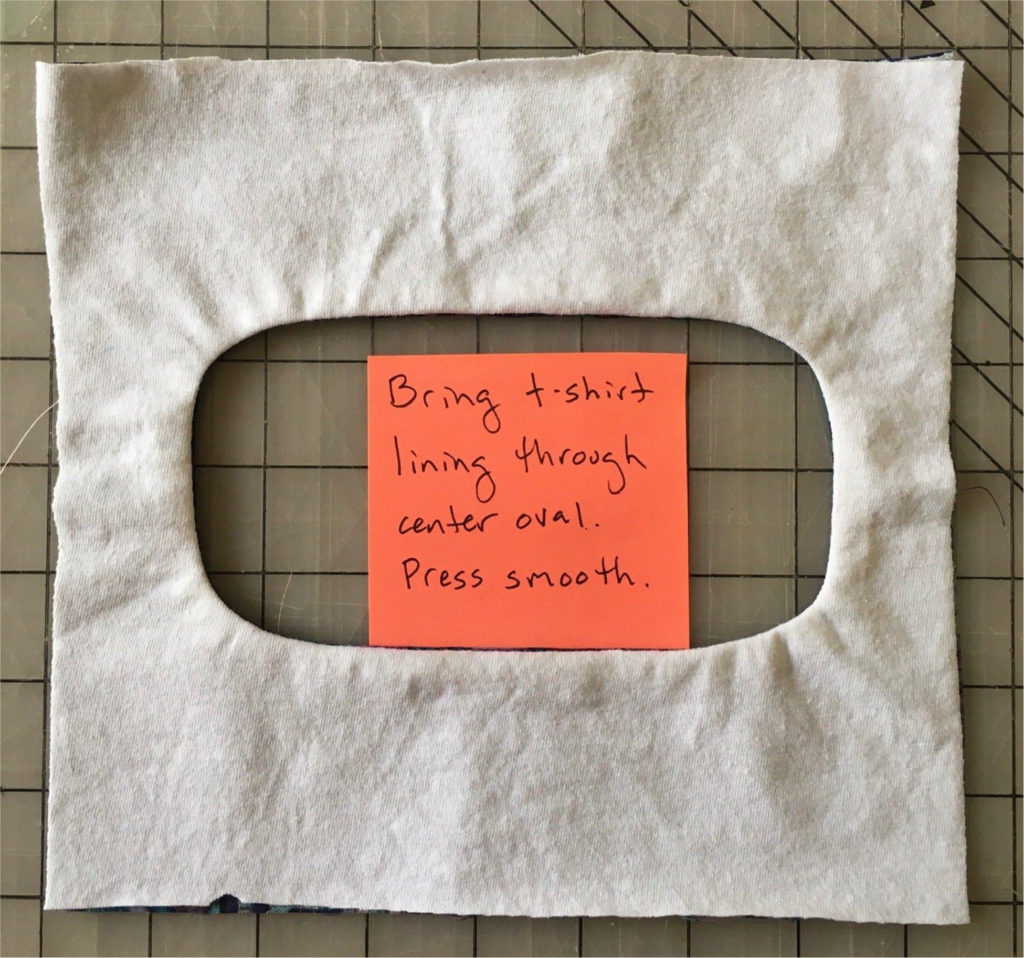
14. Pull the t-shirt layer through the center oval, press it smooth (lift and press your iron instead of dragging it.) If you don’t have an iron, hold the bowl of a spoon in your hand with your thumb in the bowl, and use the edge of the spoon to press firmly along the edge you want to press.
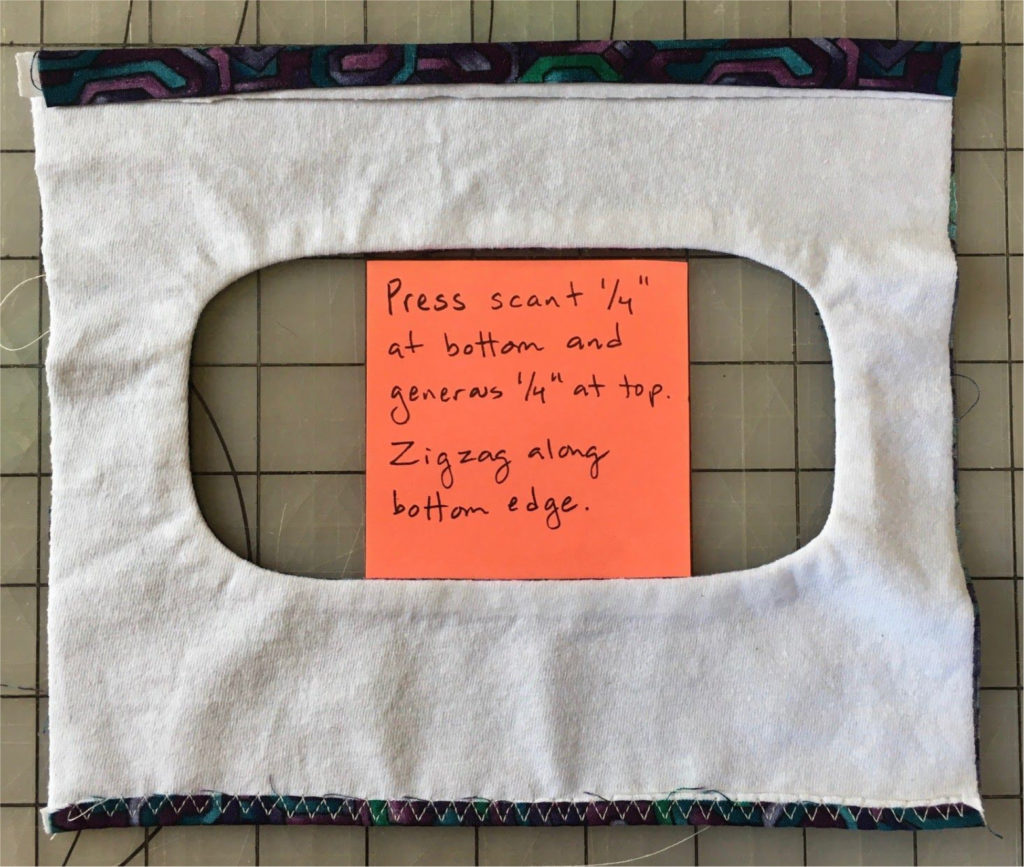
15. Press a narrow ¼” at the bottom and a wide ¼: at the top. Sew the bottom edge, use a narrow zigzag if you have it, or use your favorite hand stitch.
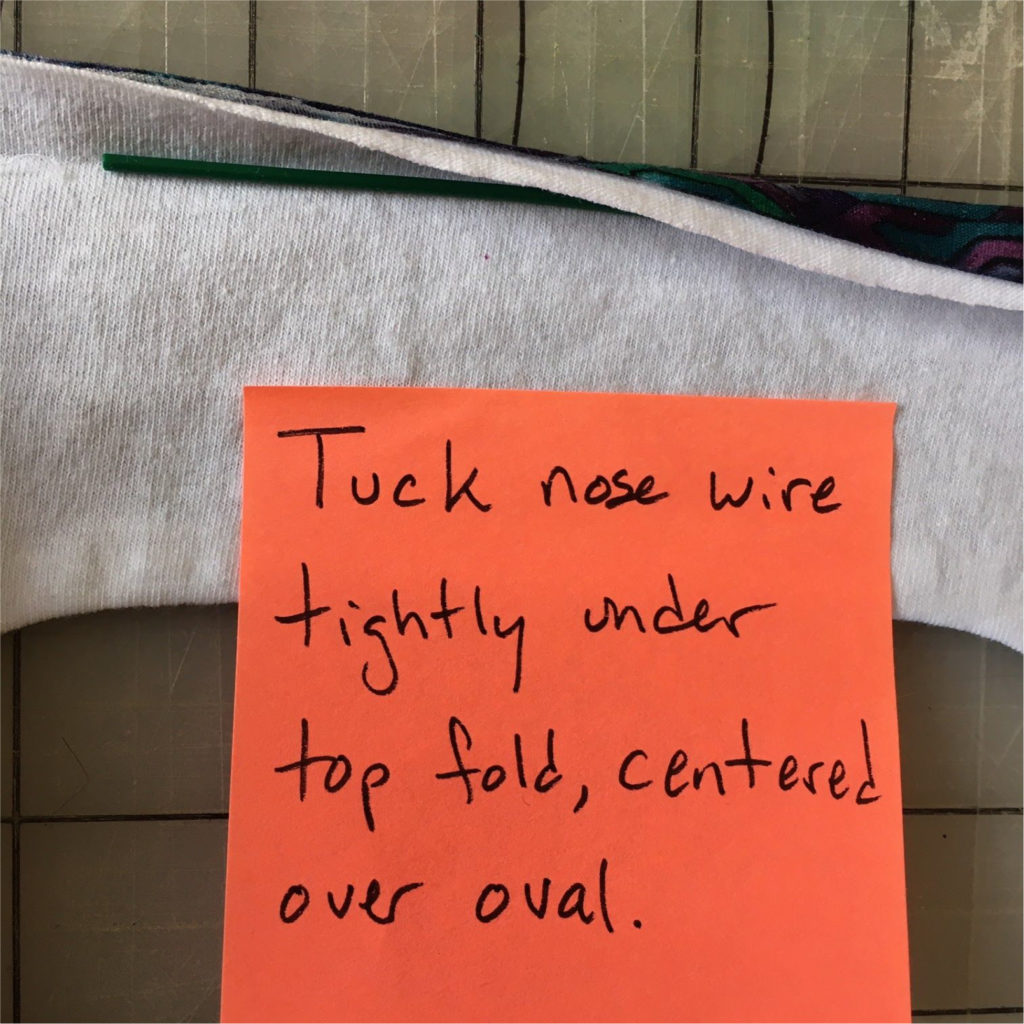
16. Place the nose wire inside the top fold, centered over the oval. If you’re hand sewing, tack it in place using some large basting stitches, then sew the whole top edge closed.
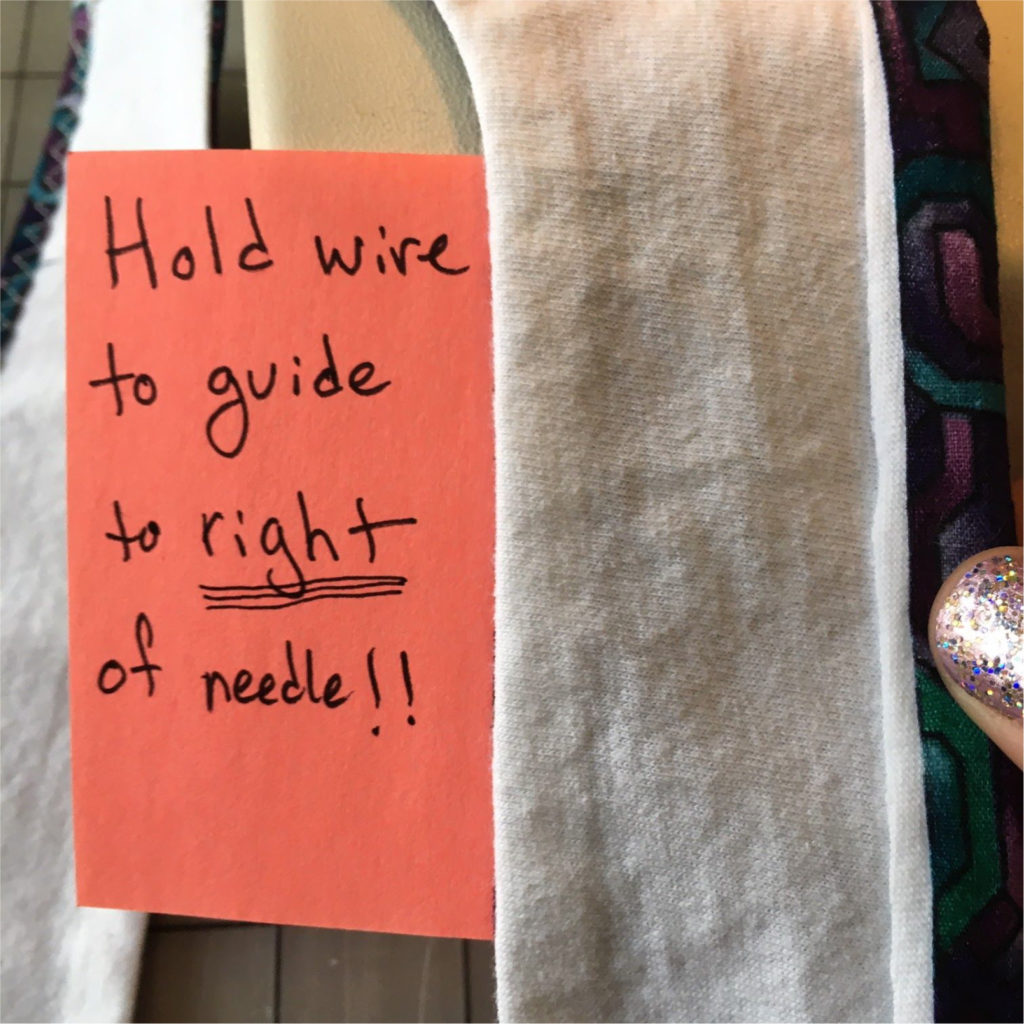
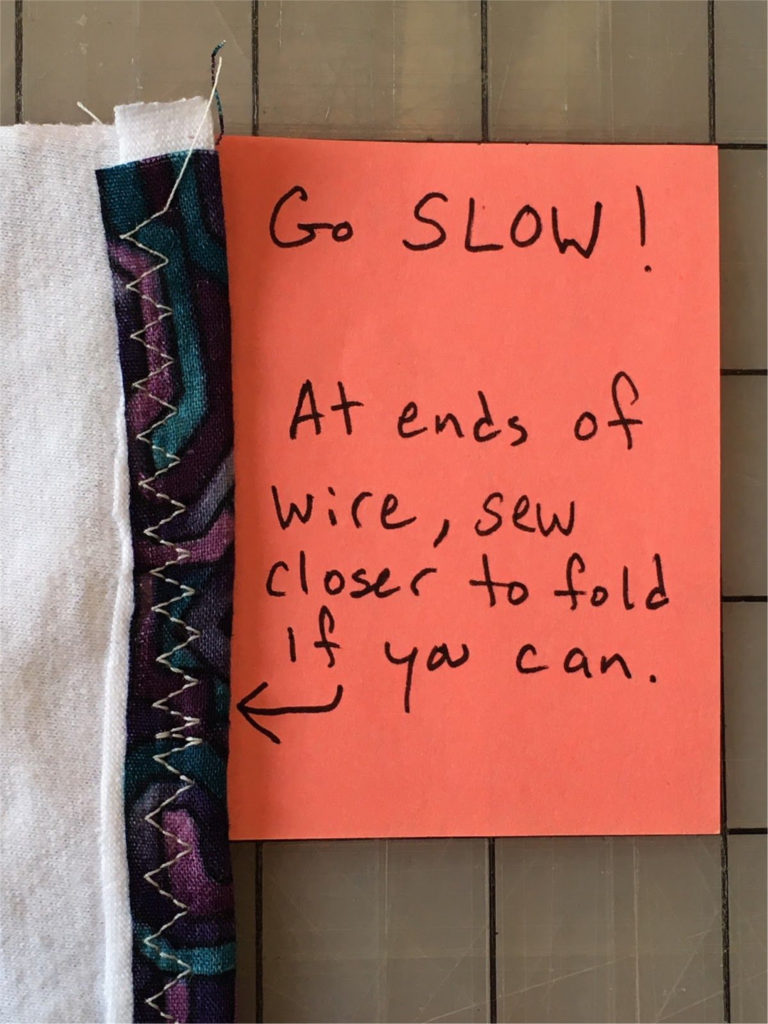
17. Sew the top edge, using a narrow zigzag stitch on your machine. GO SLOW! Breaking the needle because you hit the wire is no fun for you or your machine. I hold on to the wire to keep it to the right of the needle. At the ends of the wire, take a few stitches closer to the fold, so it creates a pocket for the wire and keeps it from sliding around during positioning or washing.
18. Using the selvage edge of the fabric along the top edge of the fabric makes a cleaner finish, but it’s not really necessary.
19. Turn the mask face up and press a firm pleat 1” from the top and bottom, bringing the edge of the pleat level with the edge of the oval. If you have an iron and can use steam for this step, do. The mask will be about 4.75” high.

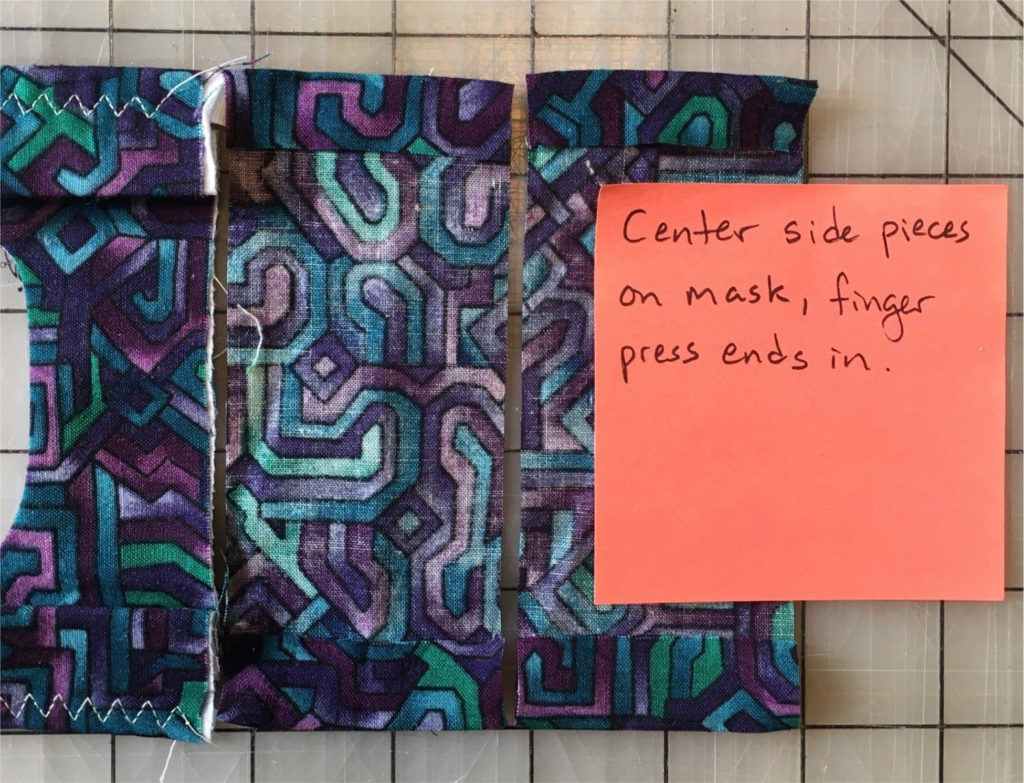
20. The ends of the mask will be a bit wonky; that’s fine. Set this aside for a bit and make the side pieces. Take the 6”x2” strips, and press in about ½” on each end. Matching it up directly to the mask is best. (If you have single- or double-fold bias binding, unfold it, iron the ends in, refold, and press to reinforce the original folds.)
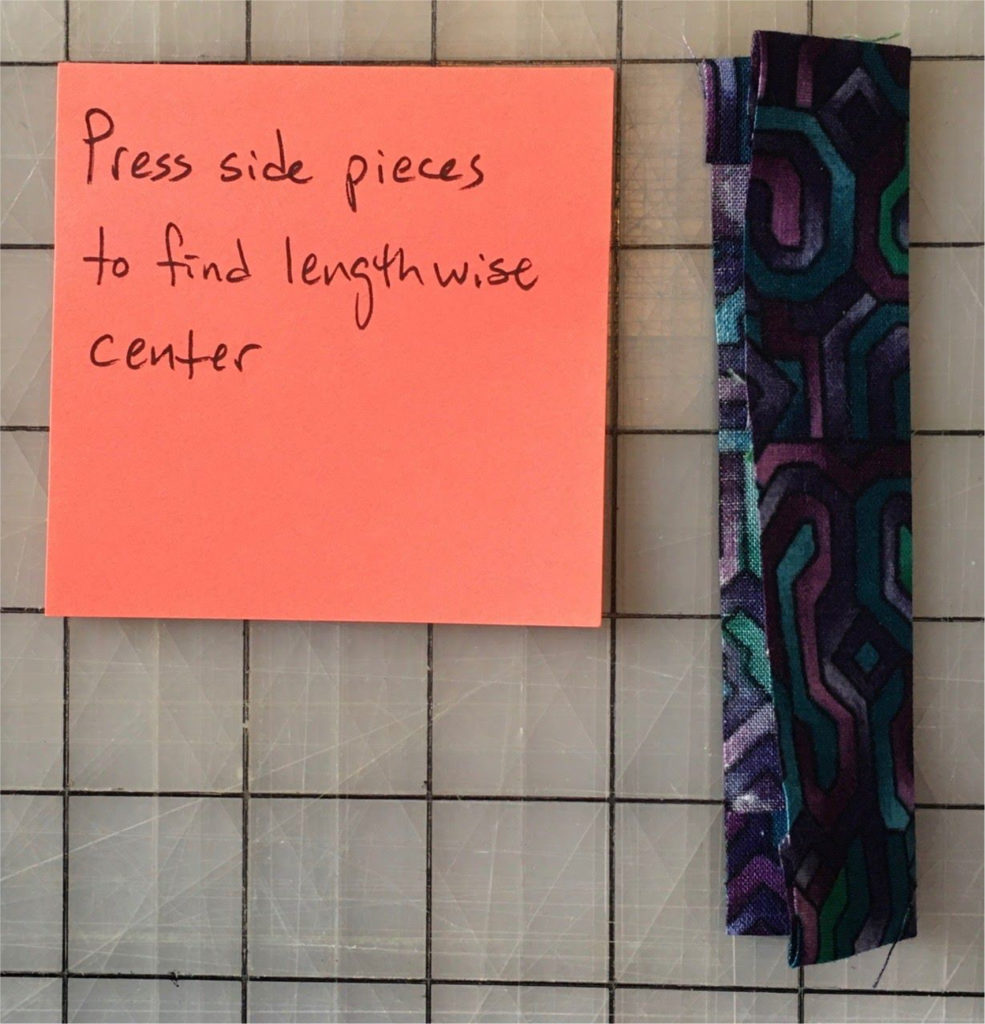
21. Press the side pieces along their own long center line.
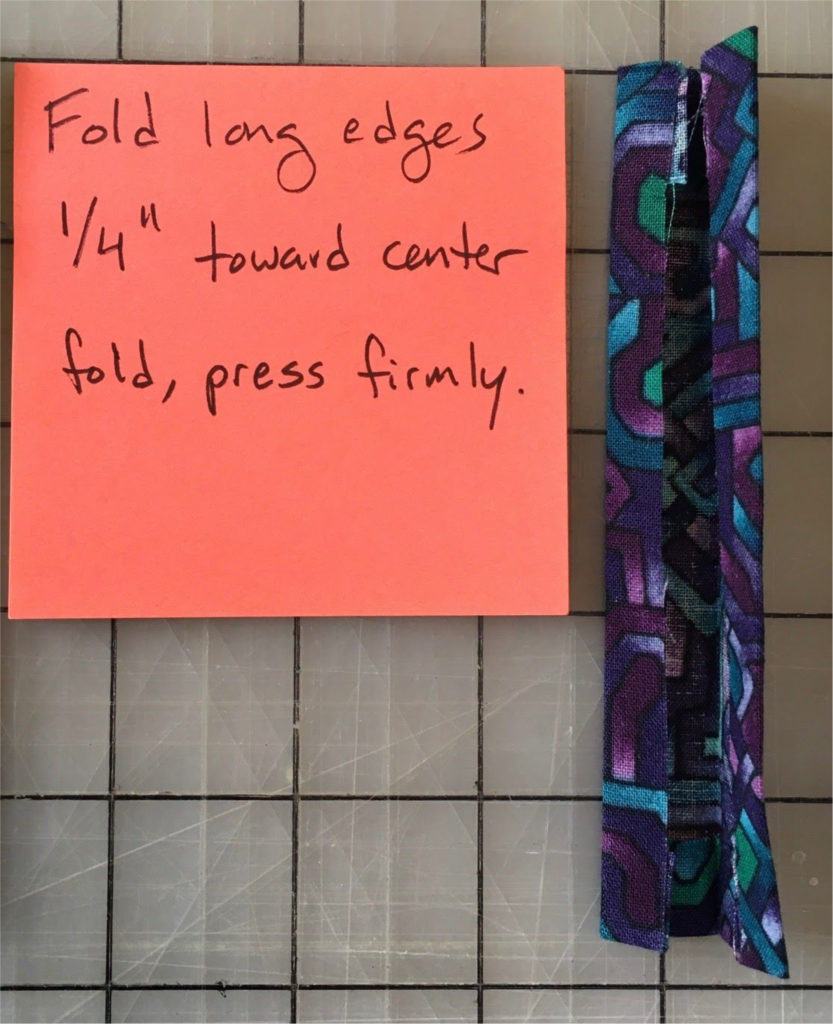
22. Press ¼” of the long edges of the sides toward the centers. Press firmly, and use steam if you have it. (This has the same profile as a piece of double-fold bias tape.)
23. Tuck the rough ends of the masks into the side pieces and pin in place through the pleats and parallel to the edge of the side pieces. The goal is to keep pinholes AWAY from the body of the mask. If you are using a machine, pins on the right side of the mask point away from you, on the left they go toward you; this makes it easier to pull them out as the fabric goes under the needle. Sew along the inside edge of the side pieces. GO SLOW! This is 16 layers of cloth for the pleats, and that’s a LOT for most machines. For hand sewing, this is also a whole lot; be careful, use a very sharp needle and thimble. BACKSTITCH the ¼” at the top and bottom of the seam.
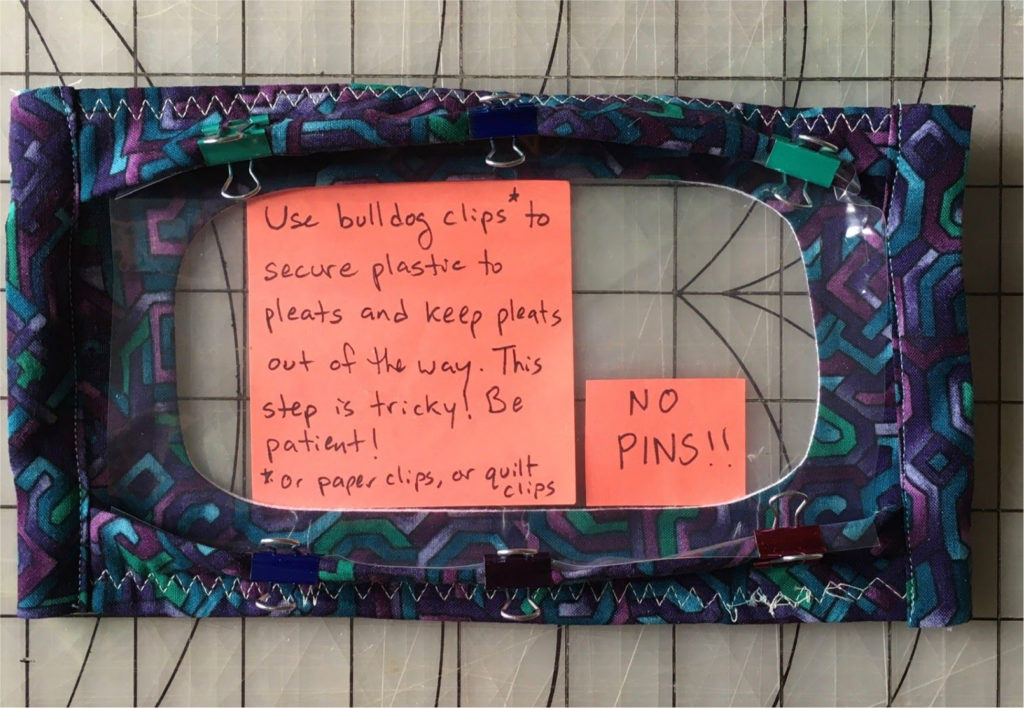
24. This is the trickiest part! Place the clear panel on top of the oval, tucking it well into the pleats. Use the bulldog clips to secure the plastic to the pleats, which also keeps the pleat pulled back from where you are going to sew. Be patient! The plastic is slippery and clear and it needs convincing. Also, you need to take care to not distort the oval. You may need to do this step over a few times before it lays smooth and is ready to sew. The plastic will cover most of the face of the mask; that’s ok, you will trim some away later. Keep pins well away from the plastic!!
25. Ok, this is REALLY the trickiest part. Starting at the short straight edge of the oval, topstitch through the plastic and along the inside edge of the oval. Use the handles on the bulldog clips to hold them out of the way of the needle housing, and GO SLOW!! If you can, set your machine to have the needle stop in the lowered position, and pivot as needed. Use the handles on the bulldog clips to keep them and the pleats out of the way of the needle housing.
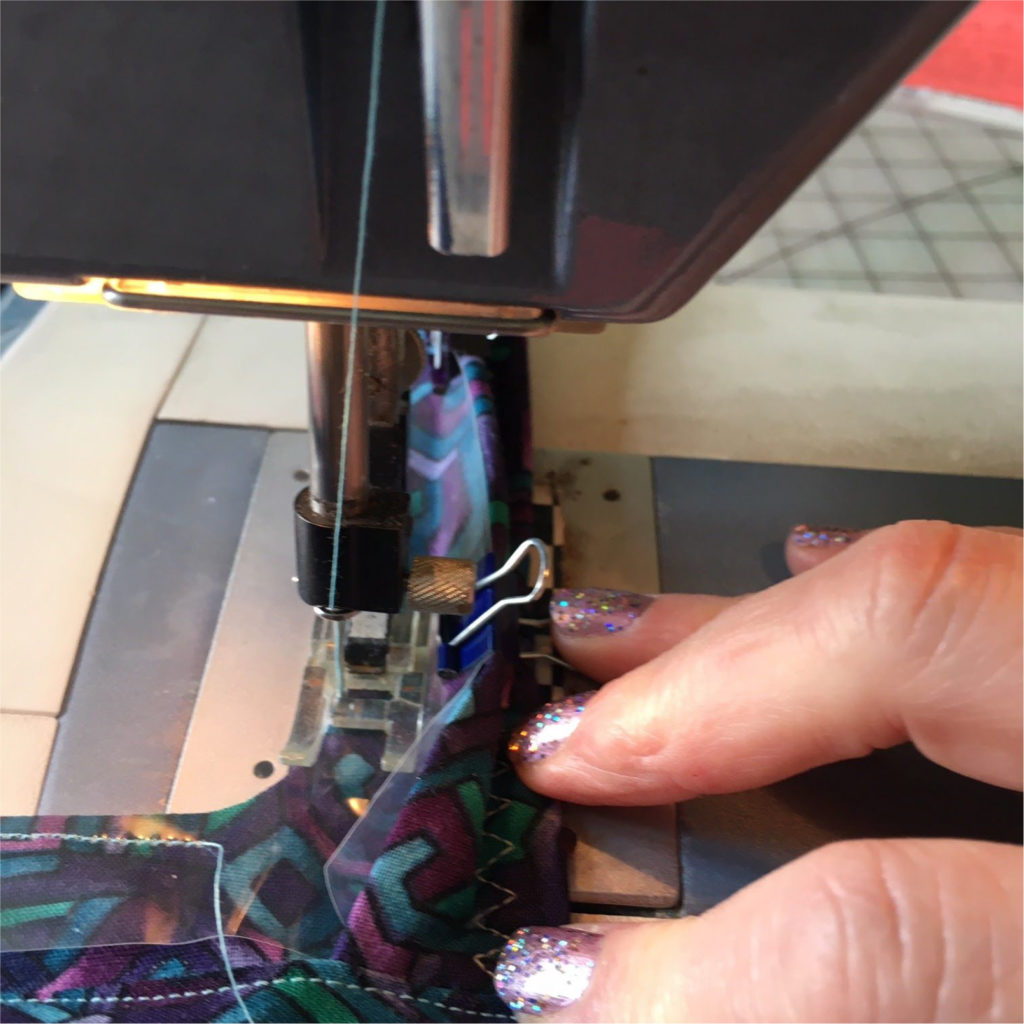
For hand sewing, plastic is not easy to sew through, and you want the closest stitches you can reasonably manage. Be careful. I’m working on finding a glue that will bond the plastic to the cloth and withstand frequent washing.
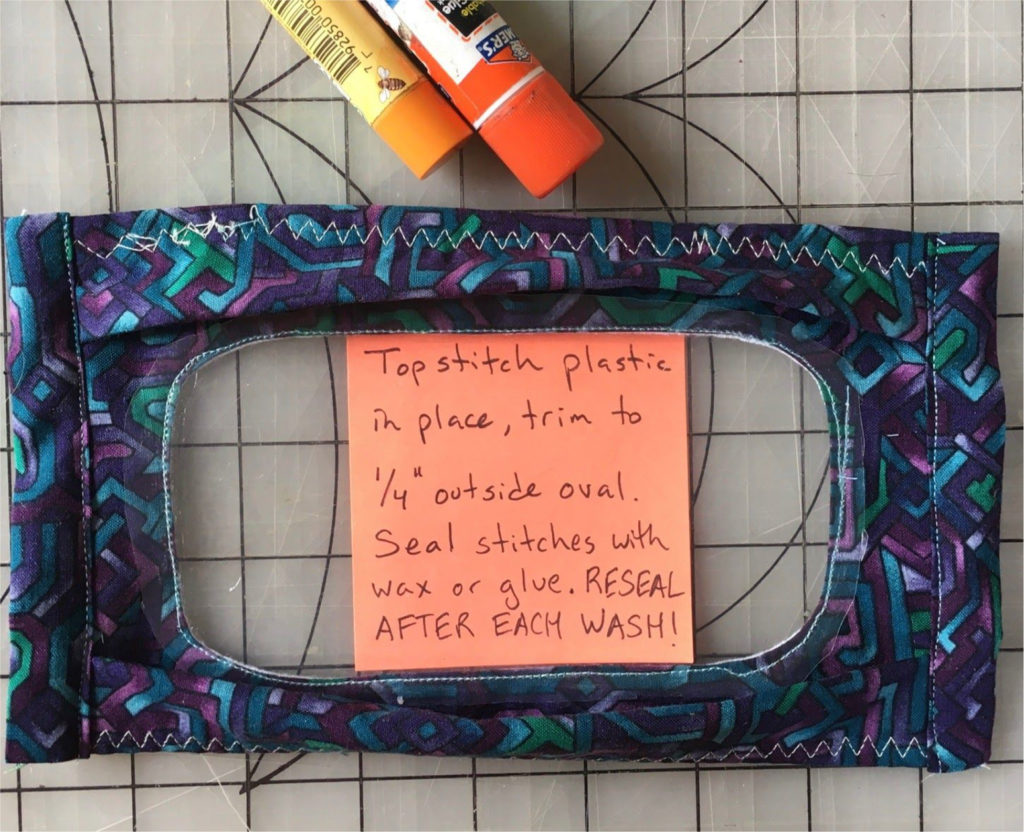
26. CAREFULLY trim the plastic to about ½’ away from the topstitching line. A bit narrower is fine, but keep it over ¼”, so there’s room to add sealant along the stitches.
The topstitching needs sealing AFTER EVERY WASH! This is an extra precautionary step, because the plastic is of course impervious, but the needle holes are kinda big, and as the virus is tiny, use a sealant. School glue and beeswax lip balm both have clean edges that work well for pressing along the stitch line. I have not tried superglue or gorilla glue or etc, but plan to soon; I need to test how it reacts to the PEVA plastic.
27. Thread the t-shirt tie through the large-eye needle, down through the right side piece and up through the left side piece. Tie knots in the ends.

28. Place the loop around your neck, run the ties over your ears and tie the ends behind your head.
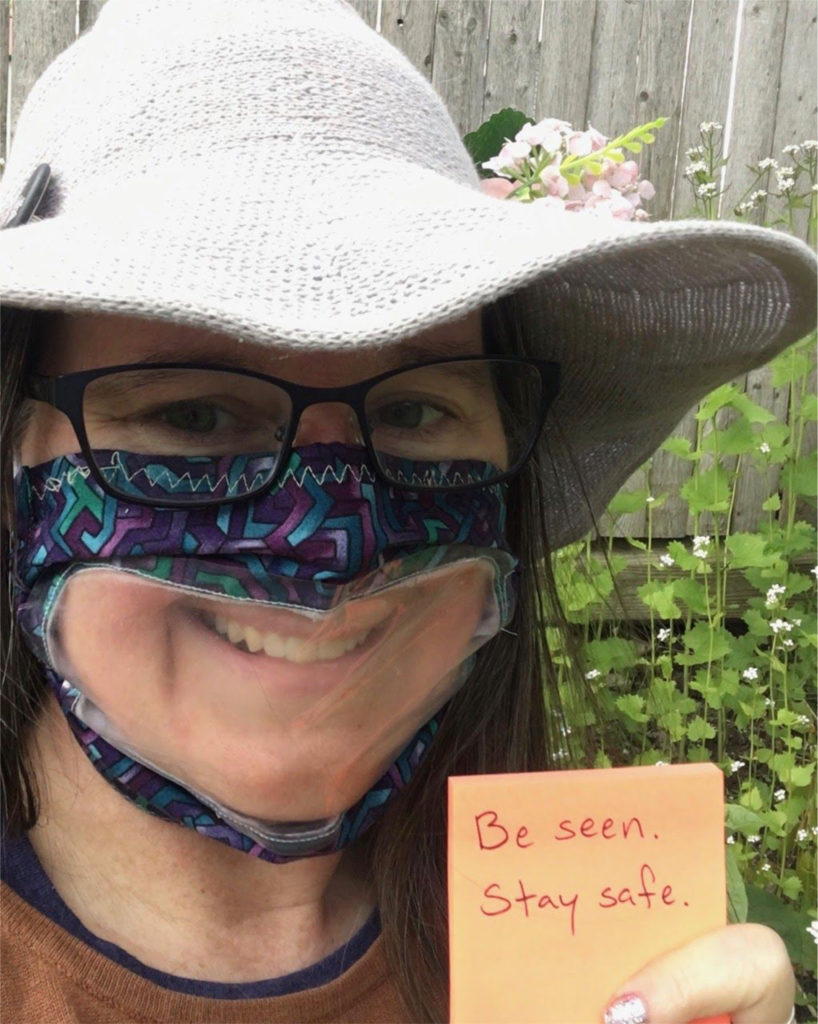
Dr. Tully has successfully worn the Visible Mask during a full shift at work, and I tested mine while gardening. It does get a bit steamy at times, but it also can be aired out quickly and safely, and dries thoroughly with a wipe of a paper towel, where a solid cloth mask stays damp.
Like all pleated masks, the Visible Mask is to keep YOUR germs CONTAINED, not to seal your mouth and nose from all particles suspended in the air. The efficacy has not been tested aggressively, but the design is informed by materials and methods that have been.
Be seen and be safe.